Tag Archives: buttons

Black Swan Theme Hair Band Accessory – Using Vintage Buttons, Beads, Felt and Embroidery

Standard

Sooo pleased with this!

Alice Band Black Swan

A little project just for me. I just couldn’t resist making myself this cute head band. The swan itself was drawn by myself, transferred onto felt and embellished with a lace ‘half’ yo-yo’, then decorated with seed beads. Other decorations I added were some little vintage black buttons, bugle beads and faceted glass beads. For the eye I used a vintage green Mother of Pearl button with a fish eye design. I embroidered a simple trellis on the chest too.

I’m so pleased with this, I’m going to make a few more animal designs. Next I want to try an octopus, I think this will look great too in those white and dirty vintage creams and off pinks. *squeals* can’t wait!

Oh, and to top it off.. I’m going to the NEC in Birmingham to the Sewing for Pleasure Craft Event at the end of March! Will be buying loads of fabric goodies and crafting essentials.

Let me know what you think of my head band below! Happy Crafting. =]

Black Swan

Front view

Felt Bookmarks with Embroidery detail and Applique Gift idea

Standard

Gift for an avid reader!

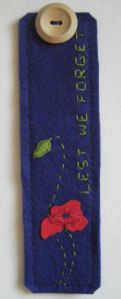
Veteran Remembrance Poppy

Jacobean Peony Flower

These 2 bookmarks were made for my Grandparents. My Grandad is a WWII veteran and his father was in WWI. So a gift to show we still remember what they gave was lovingly received. My Nan, she just loves her flowers. At a risk of being boring or predictable, I designed a Peony flower in a Jacobean style. I guess it could also pass for a rose too. However, I thin it worked out looking nice. Let me know what you think below in the comments!

I want to share some tips with you about working with felt. Although I’m a relative newcomer to felt. I have taken some time working with it. Especially embroidering. It’s not too hard to embroider onto, altho if you tug at the work the felt will, over time distort. The worst is, you probably won’t notice until it’s too late and you’ve done all the hard work. Soooo.. my tip is to work with a piece larger than you intend to use for the end result. That way, the edges you’ve been gripping during any sewing will be trimmed off and you’ll have a lovely neat finish.

If your felt is thin or the acrylic type. You might want to strengthen the overall design by sandwiching a light card in between another piece of the felt. Sew close to the edge of the card. so that it’s trapped inside. A thin layer of PVA glue between the layers is a good idea too.

To finish I topped them with a button, and on my Nan’s, a bit of ribbon from my stash. These are around 6.5″ x 2.5″ in size. The poppy design ended up being a smidge taller due to the script.

The stitches used are, running stitch, satin stitch, back stitch, heavy chain, trellis, split stitch, french knot and fly stitch.

Any questions about these bookmarks are welcome, please comment below!

Appliquéd

Poppy close up

Knitted Cowl / Buttoned Scarf – How to – using super chunky wool

Standard

Knitted Gifts Fast

Fast knits!

This super chunky knitted scarf took less than a day start to finish. Including figuring the style and making the buttons. The pattern was one I thought of that would work best for this project.

You can use any alternatives but these are what I used and would bode best for this pattern. Plus the quality of the yarn speaks volumes on this project. Ideal as a winter time gift.

Dimensions 7.5″ x 28″

What you need
1 x ball of  Sirdar Denim Ultra Wool (super chunky)
8mm Knitting Needles
3 x 15-18mm Odd but similar sized buttons with preferably 4 sewing holes.
Small piece of colour coordinating Wool Felt to cover buttons
Needle and thread

Directions
Using the 8mm knitting needles
Cast on 18 sts

(Rib pattern row)
[Row 1 -K2, P2 until last 2 stitches, K2]
[Row 2 -P2, K2 until last 2 stitches, P2]
knit Row 2 of rib pattern
knit Row 1 of rib pattern

(Body of scarf)
(right side row)Knit row
Purl row
P2, K14, P2
K2, P14, K2

Continue scarf body pattern until you reach 26″ ending on a wrong side

Knit Row 2 of rib pattern
Knit Row 1 of rib pattern
Knit Row 2 of rib pattern

Cast off and tie in any ends not weaved in.

How it's fastened

The buttons were made using a simple technique. With leftover yarn from the scarf. There should be more than enough if you have good tension.

Cut 3 lengths of yarn at around 8″
3 x 2″ diameter felt circles, or big enough to cover the buttons as pictured.

Tie knots in the centre to make a bobble. Split the yarn so you have 4 tails (see picture below) and thread each through the 4 eyes of the button.

Using small stitches, make a running stitch around circles of felt. Do not knot yet.

Pull slightly on the thread so that it creates a slight dome shape. Place in the prepared knotted wool and button. Pull the thread and make sure the thread covers the back of the button centrally. Tie off the thread after sewing over the felt and yarn to secure the back, as these will be pulled at when used.

Using the picture to help you with placement, use the tails of the buttons to tie onto the rib of the scarf. Making sure they line up with the natural holes created by your stitches.

The three stages of covering the buttons

Threading Technique

Finishing the button

Patchwork Square Pincushion – Ideal Gift

Standard

Make a pincushion

Click to Enlarge

I was asked to make a pincushion for my Aunt. Her favourite colours are black and white so that gave me my starting block. I think choosing fabric, is sometimes the hardest bit. I knew how I wanted it to look, so I winged it from there.

This is a rough guide to how it was made. It really is a simple design tho, let me know if you try this.

What you’ll need
½ metre (roughly) Ribbon
1 or 2 Buttons
2-3 Different Patterned Fabric (I used quilting cotton)
3.5″ square of Felt (any colour, but try not to be too contrasting if you can see it through the fabric)
Coordinating Sewing thread
Toy stuffing
Quilting Square (optional, but easier)
Read the rest of this entry

Valentines gift for him! – Easy Stuffed Magnets

Standard

Valentines Personalized Magnet

Valentine Magnet

What could be more manly than a magnet? Ok, maybe a few things, but as far as valentines go, there isn’t much choice for men. Men, in general, don’t really care about flowers, chocolates and cute teddy bears. So I decided to make a magnet for my hubby.

It was a relatively easy as far putting it together. If you have a crafty stash this will be an ideal project to use those scraps and odd ends up.

.

Materials
Sharp Scissors
Small scraps of lightweight fabric
Iron-on fusible webbing
Buttons or embellishments
Embroidery thread
Polyester toy stuffing
2 – 12mm dia  x 3mm thick – (110 grams pulling force each)
Sewing Machine (optional)
Thread
Pins

Directions
Cut out two heart-shaped pieces of fabric, they don’t have to match. You can experiment with different colours or just use a plain coloured fabric on the back.

Print out a name or a word you want used on the heart, such as; love, xoxo, ur gr8, txt me, nicknames would work great too, etc. What word you use all depends on the size you choose to do. Remember the larger the piece the stronger the magnet you need. To be safe, I used two on mine.

Cut out the letter on fusible webbing and arrange them on your hearts. Make sure you leave room for your seam. ¼″ is usually enough. Press for a couple seconds, long enough for it to bond.

Sew the magnets on the inside of the back heart fabric. I don’t have a picture but just sew over the magnets until they are trapped in a web of thread. This way you won’t have magnets showing or messy glue to deal with.

Back detail

Here is detail of the back so you can see how it looks with the magnets sewn in.

Next you will want to embellish the front of your heart with little ‘X’s’ and ‘O’s’. I used tiny buttons as ‘O’s’ and threaded them on using a coloured embroidery thread. You can embroider anything you feel right to your valentine.

Turn the right sides of the two heart pieces together. Pin to secure and sew straight stitch to seal, remember when you sew up to leave at least an inch so you can turn it out after. I recommend leaving the gap on the straight edge of the heart so it will be easier to sew up. For best appearances trim the inside corners and curved edges, where the fabric is likely to make the outside look crumpled.

Stuff as much stuffing as you would like inside into your mini cushion shape. Sew up the gap.

You’re done! An intermediate sewer could do this within the hour too!